How I Paint My Taghmata – Part 3

I never thought it would take me three posts to show how I paint a single model, especially one with few intricate details like a Castellax, and especially as I am showing just the steps I do on the main areas. I had many pictures, however, and to put them all in a single post would have been too much. Who would have ever scrolled it to the end? I would not have, I am sure.

Today I am going to show you how I paint the black flames and how I completed the model’s base.

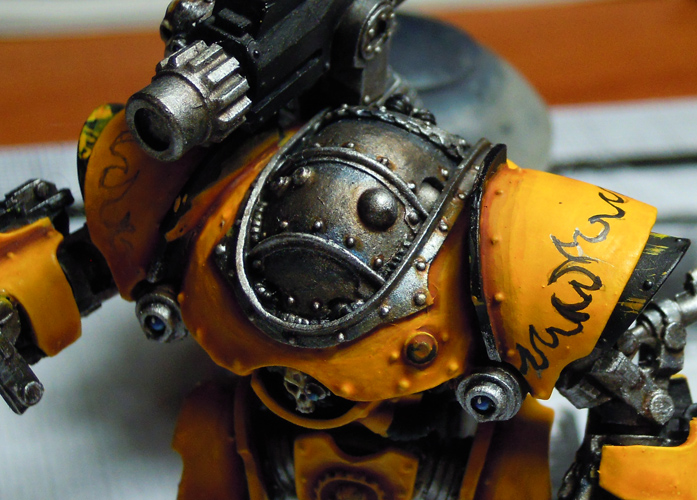
The first step was to do some research. There are many ways to paint flames on our models, so you cannot just pick the brush and start applying the colour. You have to choose a style. I wanted my flames to be as similar as possible to those on the Legio Fureans Titans from the Horus Heresy Book 3: Extermination, so I began studying the pictures on that mighty tome and those I took in Warhammer World last year.

Legio Fureans TitanLegio Fureans Titan side viewLegio Fureans Titan Carapace

Just looking at the pictures is not enough, you need to study them and practice on paper to recreate at least the feel of the design you choose, if not that same design. In addition, you do not have to focus only on the single details (in this case on the single flames) but also on their relations (distance between two flames, shape of the void spaces, angle of intersection, etc.). It is the relations among the things that make them what they are. In addition, you need to be conscious of these relations because you might want to adapt them, to change them a little to get a result that is more interesting or that better suits your needs. Just look at the following examples I just sketched: all the flames have the same typical “double curved” shape of the Legio Fureans flames, but changing the relations among them gives you completely different patterns.

Flames sketch

Do you see what I mean? Once you choose a style, it is best to practice it a bit on paper before transferring it on the model, so that you can pinpoint eventual issues and devise a way to solve them. Then pick a sharp pencil (I use an HB graded pencil) and start drawing where you want your pattern to be, like that:

Pencil flames

Then thin your colour to a milk-like consistency and carefully trace the outlines you drew. Do not be too afraid of doing some mistake, as you can still cover them up at this stage.

The flames traced with Badab Black

Lastly, fill up the shape:

The shoulder pad with the flames on it

Et voilĂ ! Well done, don’t you think? Now, it is time to apply the final touches to the Castellax (such as adding the heat discoloration on the flamers) and then go back to the base. First, let’s drybrush some Codex Grey and Fortress Grey on the rubble, to highlight it and tie it to the ruins on the bases of my Thallaxes.

Codex Grey and Fortress Grey

Then it is time for the Agrellan Earth, but I will not use a brush to apply it. I do not know if it is just me or if it is a common issue, but if I use a brush I invariably end up with a thin layer and the resulting cracks are too small for my liking. It does not matter how hard I try to get a thick layer: if I use a brush, I am unable to achieve it. I discovered, however, that I can elude this problem by using a spatula. A brush tends to drag the colour around, while with a spatula you can accumulate it wherever you want. You do not even need to use a proper and expensive spatula: I use one of those sticks that are used to keep stiff the collar of a shirt.

Spatula

The best thing about this instrument is its rounded tip, which you can drag on the colour layer to create natural looking depressions and elevations. If the layer of colour you applied is thick enough, by slightly varying the applied pressure you can sensibly vary the deepness of the depressions. Notice that I did not apply the Agrellan Earth on the areas where the feet of the model will be, so it will be easy to glue it in place.

First layer of Agrellan Earth

With a base this big, however, in some areas the colour layer ended up being too thin anyway, so I had to apply a second layer of Agrellan Earth on selected areas.

Second layer of Agrellan Earth

Then I end up by stippling some Hexos Palesun with a large drybrush, before gluing in place some grass tufts.

Hexos Palesun

The desert base is done! Time to finish this model and begin the next project in line!

The finished CastellaxCastellax - angled view

(Maybe I should add some weathering on my models… I think it would greatly improve them).

Nurgle Plague Toads and WIP Adeptus Mechanicus Fortress

I am lacking hobby time lately, but as the Skitarii release is coming closer and closer, I realized that I need to make some room in my room (pun not intended) to put all the new models that I am going to buy, so I better move with glue and brushes. That is why I tackled two projects today. Do not worry, I am not stealing time to the Castellax that I am painting for the “Painting my Taghmata” series on this blog: it is completed already, even if I have not shown it yet (the last post will be released on Monday).

First I want to show you the Nurgle Plague Toads from Forge World. Yes, Adeptus Mechanicus and Space Marines are not my only armies, in the last years I have been tempted by the Ruinous Powers too, and I have a large collection of Chaos Space Marines and Daemons, which gave me many satisfactions on the battlefield during more than a campaign.

Nurgle Plague Toad 1Nurgle Plague Toad 2Nurgle Plague Toad 3

Maybe the white background was not a great idea for these pictures, and the light was not the best one to show the colour transitions. The models look quite boring for now, but I have not done a lot yet, just applied some red in the mouths and open sores, the first layer of Rakarth Flesh on the skin and the first Atonian Camoshade wash. In the end their colour scheme will be like that of my Plagueridden:

Converted Plagueridden

…but with the Plague Toads I will probably also make some experiment with the Nurgle’s Rot technical color.

These models, however, are exactly as amazing as they look in the pictures, full of blisters and wounds, and even if painting all those little details will be much time-consuming (the rashes will take days), it will be a great experience. The Plaguebearers were really fun to paint (I needed to paint some “skin” after so many years of power armours, true, but still…), so I expect the Plague Toads to be no less so.

Then I came back to the fortress I started building for my Adeptus Mechanicus force some weeks ago and glued the grids to the lower structure, the railings to the ceiling sections and some other bit here and there (including a main access door, which cannot be seen from this side). Still a lot of work to do, but this slight update really made it silhouette more interesting, in my opinion.

Adeptus Mechanicus Fortress

Speaking of modelling projects… it looks like the new Skitarii models will be an endless source of bits to convert Tech-Priests! I was right to wait to work on my Cairn Wraith conversion!

How I Paint my Taghmata – Part 2

In the previous post of this series I painted the metallic parts of the Battle-Automatas, while this post will focus on the yellow areas. Once the rarest color to see on Warhammer 40,000 battlefields, in recent times more and more painters started using it, not just on some details of their models, but for entire armies. The reason, as pointed out in a comment to this post, is the new Averland Sunset color from Games Workshop. In the past, I remember that almost every recipe to paint a solid yellow involved at least five layers of thinned paint on a white undercoat. And now? Look at the following pictures: it only takes three layers of thinned paint (2:3 or even 1:2 color to water) to completely cover a BLACK undercoat. Pure sci-fi, until some years ago. Probably they put some magical ingredient in its formula, like the powder of a unicorn’s horn. Who knows?

Averland Sunset - first layerAverland Sunset - second layerAverland Sunset - third layer

On my Thallaxes, after these step, I decided to highlight with Yiriel Yellow, but the Castellax is quite different from, them. It is bigger, and it has wider surfaces, so using the same technique was not an option: in the end, it would have looked even more plain than its smaller brothers. I had to proceed gradually, layering different tones to get a smooth transition up to pure yellow. So I decided to go for a wash of undiluted Seraphim Sepia, giving an orange tone to the shadows in the recesses. I will another sepia wash at a later stage, but it will be watered down, to level out the colors more than to add shadows.

Seraphim Sepia wash

Then I applied again some watered down Averland Sunset, carefully avoiding the recesses of the model.

Averland Sunset - again

And after that I layered a 2:1 mix of Yiriel Yellow to Averland Sunset, making sure to leave some Pure Averland Sunset show near the shadows. When I am layering, I usually mix the colors with a 1:1 ratio to ensure a smooth transition, but only if they both come from the same range (eg. both are Base or Layer colors). When you are mixing a Base and a Layer color, however, you have to remember that the Base color has more pigment in it than a Layer color, so mixing them 1:1 will probably result in a tone that is too similar to the Base color. You might want such a result, especially if you are going for an even smoother transition than I am, but I think that this is enough. Even looking at the model with you own eyes it is difficult to discern where pure Averland Sunset ends and the mix begins.

2:1 Yiriel Yellow to Averland Sunset

Then I applied a couple of layers of thinned down Yiriel Yellow…

Pure Yiriel Yellow

…and washed the yellow areas with a 5:4 mix of Lamian Medium to Seraphim Sepia, to give them a slightly orange tint and to smooth the color transitions.

5:4 Lahmian Medium to Seraphim Sepia

Wow. I never thought painting a single Castellax would have taken so much time. That’s it for now. Next step: painting the black flames, finishing the base and adding the last touches.

Forging a Campaign: Experience

In the previous posts of the “Forging a Campaign” series, I proposed some home rules to integrate Heroes and the Serious Injuries that they can suffer in battle. Today, as promised in these occasions, I will try to give some guidelines about how Heroes can gain Experience from the battles they have fought in and how they can become stronger.

After each battle, determine the experience gained by each Hero using the following rules: Continue reading

How I Paint my Taghmata – Part 1

So, today I am posting the first part on a small guide to show how I paint my Battle-Automatas. The process in itself is not very time-consuming, but as I have a fulltime job, I will need some days to complete it. Today I will begin with the metallic parts.

After a solid black basecoat, the first step is to apply a Leadbelcher base on all the areas you want to be metallic. As you can see, I also applied some Dark Flesh on the skulls, but I will paint them in a second moment.

LeadbelcherLeadbelcher

I also applied the Leadbelcher to the reinforcing rods on its base. I marked with some yellow colour the place where the Castellax will be glued, so I can avoid covering these spots with the Agrellan Earth.

Leadbelcher

Then is the time for a good wash of Agrax Earthshade. When I am in the initial stages of a model, and I do not risk of ruining other areas that I have already painted, I prefer to use an airbrush to apply the all-over washes. It gives a more solid finish, dyeing evenly the underlying colour as if you were using Photoshop or any other images editor that implements the concept of level. This time, however, I preferred to use a brush, dragging it from the most raised areas to the deepest ones, to get a smooth transition.

Agrax EarthshadeAgrax Earthshade

I obviously did the same to the reinforcing rods on the base.

Agrax Earthshade

Then I carefully applied a thin glaze of Guilliman Blue in the recesses and on some of the flat surfaces, being careful not to touch the extremities or the raised areas, which will be highlighted in a second moment. You will notice that I did not glaze the ammo feed. This was intentional, as I do not think it is made from the same material of the Castellax. Moreover, I need to break the “monotony” of the back of the model. There is too much silver there, so I will need to differentiate between different tones. As for the barrels of the weapons, I will weather them with different effects.

Guilliman Blue

As the reinforcing rods did not need this step (they are not made of the same material of a Battle-Automata, after all), I layered some Eshin Grey on the rubble.

Eshin Grey

Then I applied some Ogryn Flesh on the rivets and in the recesses of the joints. I chose a warm colour to add some shadow by contrasting with the cold Guilliman Blue from the previous step.

Ogryn FleshOgryn Flesh

No, I did nothing to the base at this stage, for I needed to keep my Drybrush clean for the next step. Yes, I will drybrush Necron Compound on the most raised areas. I know that drybrushing is considered by most a “third-rated technique”, but I do not agree with this interpretation. Drybrushing is just like any other painting technique: a means to an end, a tool that you need to learn how and when to use to get effects that you cannot get with other techniques. I should write about the subject, in the near future. For now, however, let’s just show the last pictures of the first part of this article.

Necron CompoundNecron CompoundNecron Compound